Tech, Tips, and Tutorials.
Reviews, News, and Rants.

Showing posts with label photography. Show all posts

How good is your Colour Knowledge?

Colour specialists x-rite have created a fun little test to assess how good you are at colour hues. You are given four rows with little colour boxes on them. You need to re-arrange the boxes to get a consistent flow from one hue to another. It’s easier to see this than it is to explain it, so go ahead and take the test.

The test then asks you for your age group and gender so it can compare you score to similar demographic groups. The score is a simple scale from 0 to 1000. Getting a zero means a perfect score, and anything between 0-99 is classified as good (high colour IQ). I got a 4, so I’m pretty chuffed at the good result!

(P.S. It’s filed under photography because I think it’s a good idea that a photographer has a good, working colour knowledge)

Continue Reading

Sigma DP1 (gallery up at dpreview)

Phil Askey over at dpreview.com has just posted a beta gallery of the new and upcoming Sigma DP1 (site)

The new Sigma is the latest iteration in a series of cameras which tried (mostly unsuccessfully) to capture the hearts of "serious" photographers.

There have been many notable attempts, including the memorable Sony R1, Canon Pro1, Sony V3, and a few more. Nearly none of them had any successors.

Thoughts

The Sigma had to make a very big compromise. Instead of attaching a slow zoom lens, they've gone and attached a (moderately slow) fixed prime lens, thus keeping the total size and weight extremely pocketable. This means that the DP1 will have NO optical zoom whatsoever. It comes equipped with a compact 28mm f/4 that seems to be extremely sharp.

This is because of its sensor.... an APS-C sized sensor, which is around 5x larger than compact camera sensors. Sigma have stuffed a Foveon X3 sensor in it. This created the need for a larger lens. Having such a large sensor will invariably result in much greater image quality than regular compacts.

Looking at the samples this seems to be a great camera! Images are nice and sharp, and noise is kept low. Those 4MP images look fantastic from corner to corner with little CA and distortion. They look like prime candidates for up-rezzing to much larger resolutions like 10MP or so (a signature of Foveon sensors).

Colour is excellent, vibrant yet very natural. I'm a little put off by the greens, which seem a little strange, but maybe it's just me.

I have never seen this kind of superb quality in a compact camera! I'm impressed on so many levels (Sony R1 fans: you can't call your camera "compact").

Will it sell?

Sigma have been very brave with this camera. They certainly didn't go for big numbers with this camera like virtually every other compact camera manufacturer.

They're not selling a huge zoom range. They're selling a good quality 16.6mm (28mm equiv) lens capable of rivaling the best lenses out there.

They're not selling a big pixel count. They're selling a sensor capable of outputting very sharp images, albeit low-res.

They are selling image quality.

Sigma have also done a great job on the design. It's all-black, with black buttons, knobs, etc. They've included a hot shoe and even a mini-control dial. Great for photographers! Unfortunately though, the general public isn't likely to see it that way, and will probably be more tempted by that cute pink 12MP Casio sitting next to it.


So will it sell? I certainly hope so, but unfortunately I doubt it. It's drawback sales-wise is its lack of big numbers, making it harder to sell if you own a camera store. It will appeal to the niche of real photographers who want a compact when they can't lug around their bulky DSLR.

That said, this so far seems to be a great, great compact and offers a very interesting alternative to the throngs of compacts out there. Judging by its output here, I would pick one up in a heartbeat!

Coming in Spring 2008, apparently.

Continue Reading

RAW or JPEG? (IQ #3)

Welcome to the third in a growing series of articles aimed at improving the IQ (Image Quality) of our cameras. Today's topic is Raw versus JPEG shooting.

Intro

One of the bigger questions that new DLSR buyers face is whether to use Raw mode or continue shooting in JPEG mode like they always have. Before deciding whether to shoot raw or jpeg (or both), we need to understand the difference, and the implications when out shooting.

What is a raw file?

  • A raw file is not an image file yet, at this stage it's simply data that can be used to create an image.
  • Needs specialised software to convert to an image file.
  • Is typically a proprietary file format. Each manufacturer has their own raw format, even different camera models use different formats. Some open-source formats exist (such as Adobe's DNG) but these are not overly popular.
  • All images start out as raw files, even out-of-cam jpegs. The camera sometimes converts the resulting raw into a useable photograph.
  • Has a higher bit depth of 12 or 14 bits compared to 8-bit jpegs. This gives less chance of posterisation, especially in the darker areas of an image
  • Has a much larger file size than a jpeg - if a standard 10MP jpeg is 2.5MB, then an uncompressed raw will be around 10-15MB. Can either be compressed or uncompressed.
  • Has not had sharpening, white balance correction, tone curve, saturation, contrast, noise reduction, etc applied yet.
  • As a result has higher dynamic range and the potential for the best possible image quality

A raw file is therefore suitable if you plan to edit the images yourself before printing. Jpeg files will have most of the corrections readily applied. This means that once you get your files on the computer you have less chance to heavily manipulate them.

Botched up a shot? It'll be very difficult to correct in jpeg while being very easy to correct in the raw development stage.

What is a jpeg file?

  • A jpeg file is a regular image format. It's extremely widespread and is probably the most common image format out there. It stands for Joint Photographic Experts Group.
  • Doesn't need any extra software to view. Most web browsers are capable of viewing jpeg files easily (check individual settings though)
  • Since it's already converted, it can be used 'as-is' - making it great for a fast workflow.
  • It is extremely compressed. You can fit much more onto a single memory card. Almost no compression artifacts visible in superfine and standard jpeg files.
  • Had all major settings applied already.

Therefore, a jpeg file is extremely suitable for printing straight from the camera. Usually you can apply some styles on your camera (such as 'Vivid' mode) for added or reduced effects.

If you're looking for a quick and easy workflow then opt for one that is jpeg-based. However, there are programs like Adobe's Lightroom that work great to speed up a raw-based workflow. However, each file will still need a conversion to a jpeg to be useable.

photographers have to get it right more often when shooting jpeg...

A jpeg is great for sports photographers because of the reduced file-sizes, increased buffer capabilities, and ease of transmission. A news editor doesn't have the time to stay converting raw files!

The biggest negative is that photographers have less latitude on the computer. They have to "get it right" more often when out shooting. Some cameras also benefit greatly from raw as they have weak built-in jpeg converters.

So which to choose?

Ultimately, it's a matter of convenience versus ultimate quality, which is always down to personal choice. You can't print a raw file as quickly as you can a jpeg. Then again, you can lose quality editing a jpeg file while losing nothing in raw.

If you've made your choice, then that's great. For everyone else... Food for thought.

Continue Reading

Noise Reduction Methods (IQ #2)

Welcome to the second in a series of articles aimed at improving the IQ (Image Quality) of our cameras. Today's topic is noise reduction methods.

What is Noise Reduction?

Noise Reduction (NR) is a set of tools for the photographer to use. Image noise generally comes from shooting at high ISO speeds on your camera. Typical noise reduction tools include dedicated NR software and filters. For this tutorial, we'll be focusing on using NR software in Adobe Photoshop CS2. (Latest version: CS3)

The NR program I used in this tutorial is Noiseware Professional Plug-In, but any good NR software will do. Before using Noiseware I was using Neat Image for a very long time, you may want to try that. You can also use the noise reduction filter in Photoshop, but I don't recommend this. It isn't as good as dedicated software.

First Things First

Firstly, you need to open your image. Find yourself a noisy image to try out different techniques. As I said I'll be using Noiseware but you can use any decent NR program. Noiseware and Neat Image both supply free versions of their software if you want to use those. You don't even have to use Photoshop, as they offer standalone versions of their software. I used Noiseware's Photoshop plug-in version to try out different strengths of NR and combine them with other filter effects.

the Luminance slider affects the grain-type noise, while the Color slider affects the coloured noise

Once it's open, try out different noise reduction strengths. The Luminance slider affects the so-called “salt and pepper” type noise; this is monochromatic and much like film grain. The Color slider affects the more “digital-like” noise. This typically looks like unsightly coloured blotches (called chroma noise). With both sliders, moving it right increases the noise reduction, and moving it the other way decreases it.

Keeping the Detail

often, an image which you thought was far too noisy turns out great with a quick pass through NR software... what they're capable of is astonishing

At this stage, it's important to try achieve a balance between noise reduction and image detail. Very often the automatic settings do a great job here. By applying more noise reduction you sacrifice more and more and detail. Once everything's fine and dandy click ok.

Once you compare to the original you'll realise what a huge difference some NR can make. Often, an image which you thought was far too noisy turns out great with a quick pass through NR software. What they're capable of these days is rather astonishing.

Using the “Faux Detail” Method

If you're happy with the resultant image, keep it. You can try this technique if you're not completely happy yet, or just want to learn a new technique for later down the road.

Once you have your image, apply some very strong NR to it. Adjust your sliders a long way to the right. This will create a noise-free image (or almost), but will have lost tons of its detail in the process.

There is a way to create some “faux detail”, making it seem as if the image is grainy but detailed at the same time.

After you've applied the strong NR, go to Filter >> Noise >> Add Noise... Apply the following settings:
— Amount: around 4%
— Distribution: Gaussian
— Monochromatic (important)

Once you apply this filter, you'll see the image come to life. Before it seemed to be botched and lacking detail due to aggressive noise reduction, now it'll appear to be full of detail yet not too bad in the noise department. I'm not sure exactly how this works, but I think this is because the added noise is working to mask the lack of detail, thus tricking the eye into believing that it's actually very detailed.

Below is a noisy image taken with my Nikon D40. It was taken at ISO Hi-1, equivalent to ISO 3200. It shows the image at various stages. The first is the original, untouched image. The second has been processed using the method described in Keeping the Detail, and the last has been processed using the Faux Detail method.

the last one looks the best... it looks cleaner, with less noise and more detail

In my opinion, the last one looks the best in this particular example. Especially around the double-0 button, it looks cleaner, with less noise and more detail. The noise that is there seems to be of a finer quality.

Try this technique on your own images and see which works best for you.

Final Tip

By the way, it's very important to try and get your images as untouched as possible when shooting in high ISOs. This means shooting in raw mode and disabling any in-camera NR that may be occurring. What the camera has to do in less than a second, your computer can do in a lot more time and using specialised tools. It's better to leave the noise reduction to your powerful NR software than your camera or raw converter. For digital compacts, it's going to be difficult to get any sort of result from them. In this case try your best with what you've got.

That's it for this edition of IQ. I hope you learnt something, see you another time!

Continue Reading

Blurriness & How to Solve It (IQ #1)

Welcome to the first in a new series of articles. These articles are aimed at improving the IQ (Image Quality) of our cameras. Today's topic is blurring.

Intro

we all know that feeling... coming home to find your shots all blurred!

One of the most common problems with images is that a lot of them tend to come out blurry. We all know that feeling... you think you've taken some great pictures, and couldn't wait to see them larger, share them with friends, maybe even print a few. To your disappointment; you find out later that they're blurred! Sadly, there is no real magic fix to image blur. There are 3 major types of blur that can ruin any photograph.

Types of Blur

  • Camera Shake
    This is by far the most common type of accidental blurring in a shot. Thankfully it's also easy to solve, or at least reduce. It typically looks “shaky” for want of a better word. There might even be streaks of the lighter parts of an image, or even a “double image” sometimes.

    camera shake

    CAUSE: Too long a shutter speed and, as is most often the case for bad images... bad technique by the photographer - (“What?? How can it be? Surely it's my camera!!”). You need to analyse your camera's settings before you take the photo.

    as is most often the case, it's caused by bad technique

    SOLUTION: There are a number of ways in which you can prevent camera shake. Most notably is to get yourself a tripod, and more importantly, use it. I know many people who have tripods at home yet still complain of blurred photos due to camera shake. If you don't have access to a tripod, try steadying yourself against something like a wall, or a tabletop. Breathe slowly and surely to slow down your heart beat and less the chances of shake.

    Another solution is to change the exposure settings to allow more light. Very often you'll get camera shake due to low light and/or non-optimal settings. Oh and another thing. If you can, invest in some gear which has image stabilisation. This will help with steadying the image, especially at longer focal lengths.

    The most obvious way to allow more light in is to create more light - by using a flash. This won't always work and can cause some nasty effects on your images. The best way let more light in without losing the natural lighting is to:
    — Increase your ISO sensitivity (e.g. ISO 100 to ISO 400)
    — Open up your aperture (give it a smaller number e.g. from f/4 to f/2).

    This will admit more light through the lens, resulting in shorter exposure times and sharper pictures.

  • Out of Focus
    This is when the main subject is not sharp enough compared to the rest of the image. This is different from camera and/or subject movement because it involves the use of focus and not motion to determine sharpness.

    out of focus

    CAUSE: This comes from either the automatic focusing of your camera, or the manual focusing by you. When you're manually focusing, it's hard to get it perfect, and often you'll miss by only a bit, but this will still be enough to render your subject much softer than you intended. When using autofocus, it's pretty hard to ensure 100% accurate focus, but still easier than with manual focusing.

    pay attention to how the focus plane moves when you turn that 'ring back and forth...

    SOLUTION: When manually focusing, make sure that you pay attention to any focus aids present. Nikon SLRs have a green dot which lights up when the subject is perfectly focused. When manually focusing in live view, many cameras have a magnification option, which magnifies the image quite a bit to ensure critical focusing. Pay attention to how the focus plane moves when you move that 'ring back and forth. Also, take multiple shots at slightly different focus distances if you can't be perfectly sure.

    When using autofocus, make sure that your subject is over the correct focus point e.g. the centre. Make sure that the AF has enough light and contrast to work with - a common sign is when the camera starts “hunting” to achieve focus. In this case either switch to manual focus or move the focus point to an area which has enough contrast — NOT white walls, for example.

  • Motion Blur
    Perhaps the hardest type of blur to control. This is directly related to shutter speed. It is when a moving subject is too quick for the selected shutter speed and is rendered as a blur.

    motion blur

    CAUSE: When light levels are low, or the subject is very fast, the subject is rendered as a blur. This is due to the shutter speed not being fast enough. Image stabilisation and tripods are NOT going to help you here. They can only deal with camera shake.

    set your shutter speed to around 1/500 for sports — preferably even faster

    SOLUTION: Increase your shutter speed to around 1/500 for sports — preferably even faster. Sports players move extremely quickly and it's important to capture them sharply. For people (portraits, party shots etc) try to stick to around 1/60. You can go down to 1/30 if you ask them pose, but watch out for camera shake in this case. If you don't have the necessary light think about increasing your ISO speed or opening up your aperture.

Additional tips

Don't be happy with just one shot. Keep shooting repeats! Digital is free. While in one shot they may be moving, in another they might be still. Time your shots for when they won't be moving as much if possible. Pay attention to your shutter speed settings to avoid motion or camera shake. Also, look at your LCD for some feedback on how you're doing. It's essential to zoom in to really check if you nailed focus and to check for signs of movement. Finally, while blur can be used to make a good photo, more often than not it's an image defect and not a 'feature'.

That's it for this edition of IQ. I hope you learnt something, see you another time!

Continue Reading

Nikon 16-85mm f/3.5 - 5.6 VR (rumour mill)

Hot off the rumour mill!
It's now official! See the press release (external link)


Image by: stfbfc on flickr.

Nikon appear to be poised to release a new 16-85mm lens later this month - in time for PMA. The new lens seems to be a replacement for their 18-70mm f/3.5 - 4.5.

Features

  • Adds VR mechanism: This will give roughly 3-4 stops of stabilisation.
  • Obviously, it's an AF-S lens, which means that it will focus with the D40 / D40x models.
  • Starts at 16mm. The extra kick at the wide angle compared to the 18-70 means you get a very wide 24mm equiv. FOV.
  • A bit extra reach - 85mm. Won't make much of a difference, but it makes it a nice all round 24-128mm lens for the crop bodies.
  • It's a DX format, G-series lens. This means that it will work on DX bodies (D40, D80, D300, etc), but will only work on the D3 in DX-crop mode.
  • It's a G-series lens. It has the disadvantage of not having an aperture ring. Forget working it on old manual-only film cameras. You have to set the aperture electronically via the camera.
  • Slower! This lens is a very slow f/5.6 at the long end. At least they gave it VR to compensate slightly. Making it slower means that they've been able to keep it relatively light and compact.

What it might be like

Most probably, sharpness levels will be very similar to the already excellent 18-70mm, maybe slightly better. Size and weight also appear to be similar. It will almost certainly be positioned slightly higher than the 18-55 VR kit lens. Focus speed should also be faster than the 18-70.

Pricing? Release date?

I haven't really heard anything reliable on pricing, but it appears that it will be around $300 / €300. Release date will probably be just before PMA, later this month.

UPDATE (3rd Feb 08)
Still no word on an official release date, however we do at least have some word on pricing. The RRP appears to be at £429.99 / €642.00 (roughly $850 - $950)

References

Continue Reading

Primes vs. Zooms

3 Lenses

Do you prefer to get the right focal length with a zoom, or do you think in one format like a prime? Everyone's different. I'm a prime person, but I also appreciate a good zoom when I see one.

Last Updated: 18 Feb 08 (v3)

What's a prime?

A lens with only one focal length. This means that it will not be able to zoom in and out, i.e. your shooting is limited, to a certain extent. Also known as fixed-focals.

So what should you buy? A prime or a zoom? Well first you need to know what's your preference.

Take the test to find out

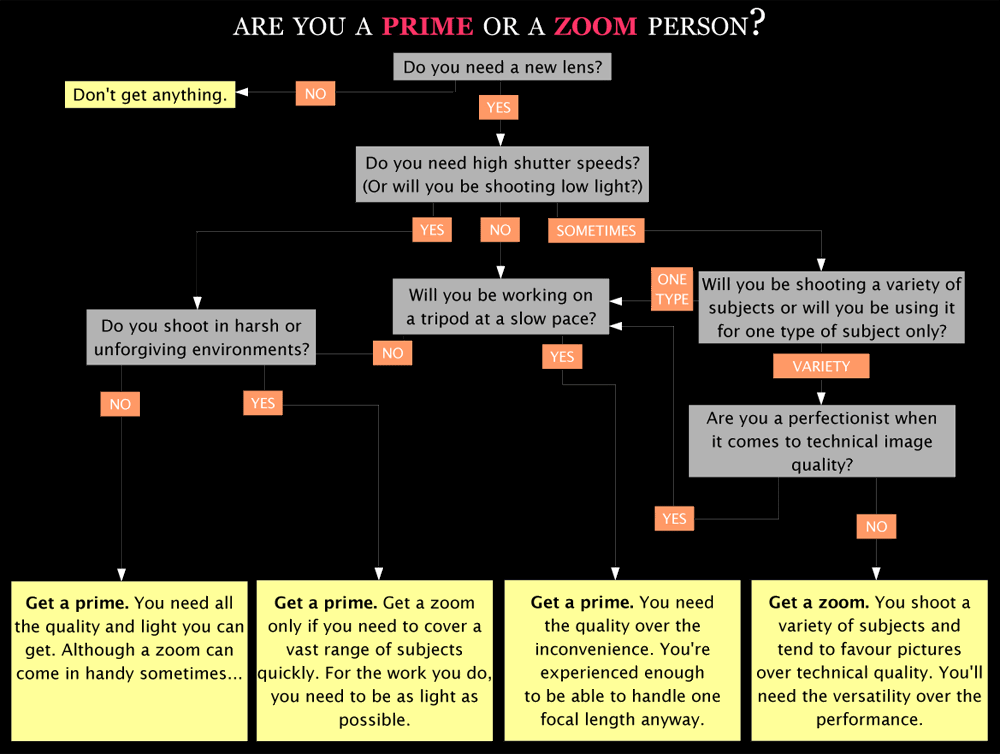
I've written a mini questionnaire that will hopefully get you closer to an answer. Taking it will help you find out which kind of person you are. Take your time, and think about each question and how it applies to you. If need be re-take it to see if you arrive to the same answer.

2 ways to download the test:
You can download and take the test in either GIF or PDF format. I recommend the PDF version.

Download links

  • GIF version
  • PDF version (link 1) (link 2)
    (note: try the first link, if it doesn't work then try the second link)
    Test Preview


    Below are advantages of going with primes or zooms. In the end it's your choice as to which you prefer.

    Advantages of primes

    - Smaller and lighter than equivalent zooms, with all other factors being equal. This is because you don't need a lot of glass to build primes. E.g. a 400mm f/5.6 prime is much lighter than a 200-400 f/5.6 zoom.

    - Primes are much sharper, especially wide open and at the corners. Because of their simpler optical formula, these lenses perform much better than zooms wide open. A zoom lens needs stopping down to get acceptable quality. You won't gain too much sharpness by stopping down a prime.

    - Almost always faster. This is probably the most appealing point. This allows more background blur and higher shutter speeds (or lower ISOs). In order to get their EF 70-200 f/2.8 IS to match their EF 200 f/2 IS, Canon would need to make it 2x the size and 2x the cost of the current version, and it STILL wouldn't be as sharp. This is simple maths.

    Advantages of zooms

    - More convenient and versatile. This is the biggest reason why zooms are more popular. People care more about being able to set a precise focal length. They don't like being limited to one focal length

    - Fewer lenses needed to cover the same focal lengths (however each one is larger, heavier, and less sharp).

    And another thing...

    I personally prefer primes for the normal range, around 18-150mm. They're more portable and offer better quality. However I like the convenience that my 18-55 offers, provided I'm willing to live with the compromises involved.

    One last point, primes have their own "character". Because of the fact that they have a simpler optical design, primes can get their own optical character. My Nikkor 50mm f/1.4 AI-S (look out for an upcoming review) has a slightly warm touch to its images and a crispness to its images. This crispness stems from the fact that the few glass elements used in the construction allow for higher image contrast. Zooms have a lot of glass inside them. When light enters the lens it will have more pieces of glass to bounce against, thus inevitably reducing contrast.

    Further reading

Continue Reading

Nikon digital SLR family

Last Updated: 17 Jan 08 (v2)

Nikon have a total of 6 digital SLRs in production today.


Consumer


  • Nikon D40
    6 MP DX sensor (announced November 2006)

    Nikon's lowest-end digital SLR. Aimed at either the absolute beginner; those moving up from a point-and-shoot; or those looking for a low-cost gateway to the Nikon system. Famous for: price and image quality. Infamous for: supporting auto focus only on AF-S/AF-I lenses. Having 'only' 6 megapixels. The Nikon D40 replaced the Nikon D50.

  • Nikon D40x
    10 MP DX sensor (announced March 2007)

    A 'big-brother' to the Nikon D40. The biggest difference is that this has 10 megapixels (4 more over the D40). It is primarily intended to provide competition to the Canon EOS 400D in the crowded 10 MP entry-level market. Famous for: Having the same image quality as the excellent D40. Infamous for: auto focus with AF-S/AF-I lenses only. The Nikon D40x has no predecessor. It doesn't replace the Nikon D40 or D50.

  • Nikon D80
    10 MP DX sensor (announced August 2006)

    Nikon's feature-full intermediate camera. Priced above the D40/x line and offers more features, including autofocus with older AF lenses. Famous for: Image quality, features. Infamous for: Often flawed Matrix Metering. The Nikon D80 replaces the Nikon D70s.


    Professional


  • Nikon D200
    10 MP DX sensor (announced November 2005)

    Offering a robust magnesium body and superb ergonomics in a compact body, the Nikon D200 is a camera mainly aimed at professionals looking for a backup body, and amateurs/enthusiasts looking for premium performance. Famous for: build quality, features, performance. Infamous for: Noisy high ISO. The Nikon D200 was a huge upgrade over the aged Nikon D100. Note: the new D300 has NOT replaced the D200. D200's are still being produced today.

  • Nikon D300
    12 MP DX sensor (announced August 2007)

    The Nikon D300 is a semi-professional camera. It has a lot in common with the much larger, professional level D3. Its main features are: a weather-sealed magnesium body; 6 fps (expandable to 8 fps with battery grip); 14-bit image processing (shared with D3); professional 51-point AF (shared with D3); 922k-pixel 3" LCD screen (shared with D3); Live View with Contrast-Detect AF (shared with D3); and a dust shaker. Famous for: professional features, value for money. Infamous for: Some early adopters are reporting faulty metering, these were replaced under warranty. The Nikon D300 doesn't replace the D200 according to Nikon literature.


  • Nikon D3
    12 MP FX sensor (announced August 2007)

    The Nikon D3 is a professional camera. It offers plenty of professional-level features and many firsts for Nikon. Most notably, it is the first Nikon to have a full-frame 35mm sensor (coined FX-format). It offers: an unprecedented 9 fps; 51-point advanced AF system; 14-bit image processing; 5.1 MP DX crop mode; 922k-pixel 3" LCD screen; Live View with Contrast-Detect AF; and a robust, fully weather-sealed body. Famous for: FX format sensor, image quality sets new standards. Infamous for: Nothing, except that the high price tag puts it out of the reach of many. The Nikon D3 seems to have replaced the D2Hs. But because it has no 'H' suffix, it is suggested that it also replaced the D2Xs. However, rumours of a high-resolution D3X have been circulating for months.

  • Continue Reading

    Why I didn't go for the Nikon D40x

    No image? Click here to attempt opening it in a new window The Nikon D40x was a camera that was released four months after the original D40. It was built so that those that felt that they need more than 6 MP will have the camera they want. It is priced to be in direct competition with Canon's EOS 400D. It wasn't intended to be a replacement model, just a “big brother” version of the D40.
    Note: This isn't an article written to justify my purchase. Read the post's title. It's an article about why I didn't buy the D40x instead.

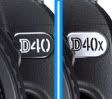
    Besides a few internal differences, the D40x is identical to the D40. It uses the exact same body, the same screen, the same menus and interface, and all the things which made the D40 such a great camera. In fact the only external difference is the badge.

    Below are the most significant differences between the two: - 10 megapixel CCD sensor (D40 has 6 MP)
    - 3fps (D40 shoots at 2.5fps)
    - Lowest ISO of 100 (D40's lowest is ISO 200)
    - Lm100 (€235 or £160) more expensive
    - Flash x-sync: The D40 is one of the few dSLRs that can sync the flash right up to 1/500. The D40x, D80 and higher can only sync up to 1/200.
    - Slightly noisier shutter. Above 1/100 the D40 uses a silent electronic shutter, while the D40x uses a mechanical shutter right till 1/4000. This is the reason for the D40's higher x-sync speed.

    One of the reasons that I like the Nikon D40 is because it has a relatively low pixel count. More megapixels mean worse image quality, given the same sensor size and tech. Anyway, 4 more MP isn't that big a deal. While 10 MP sounds like almost double 6 MP, in fact it isn't. It is only a 22% increase. In order to double the resolution of 6 MP, you would need a 24 MP camera.

    Having more MP is a good idea if you plan on making huge prints and viewing them with your nose touching the print. 6 MP is more than enough to print beautifully up to A3 size, and even A2 with some work. Who prints that big anyway? Not the average D40(x) user anyway.

    Shooting at 3 fps compared to 2.5 fps is a non-issue. 0.5fps will not make a big difference. Get yourself a 9/11fps Nikon D3 if you're serious about continuous shooting(RRP Lm5,000).

    Going down to ISO 100 would have been very important if it was a compact camera (they suck at anything above ISO 100), but the D40's ISO performance is so good, you won't miss ISO 100.

    All in all, the D40x just wasn't worth the Lm100 premium for me.

    Continue Reading

    Sony N1: Overview

    I have a Sony N1, and have published an extensive review.

    Go to the review now

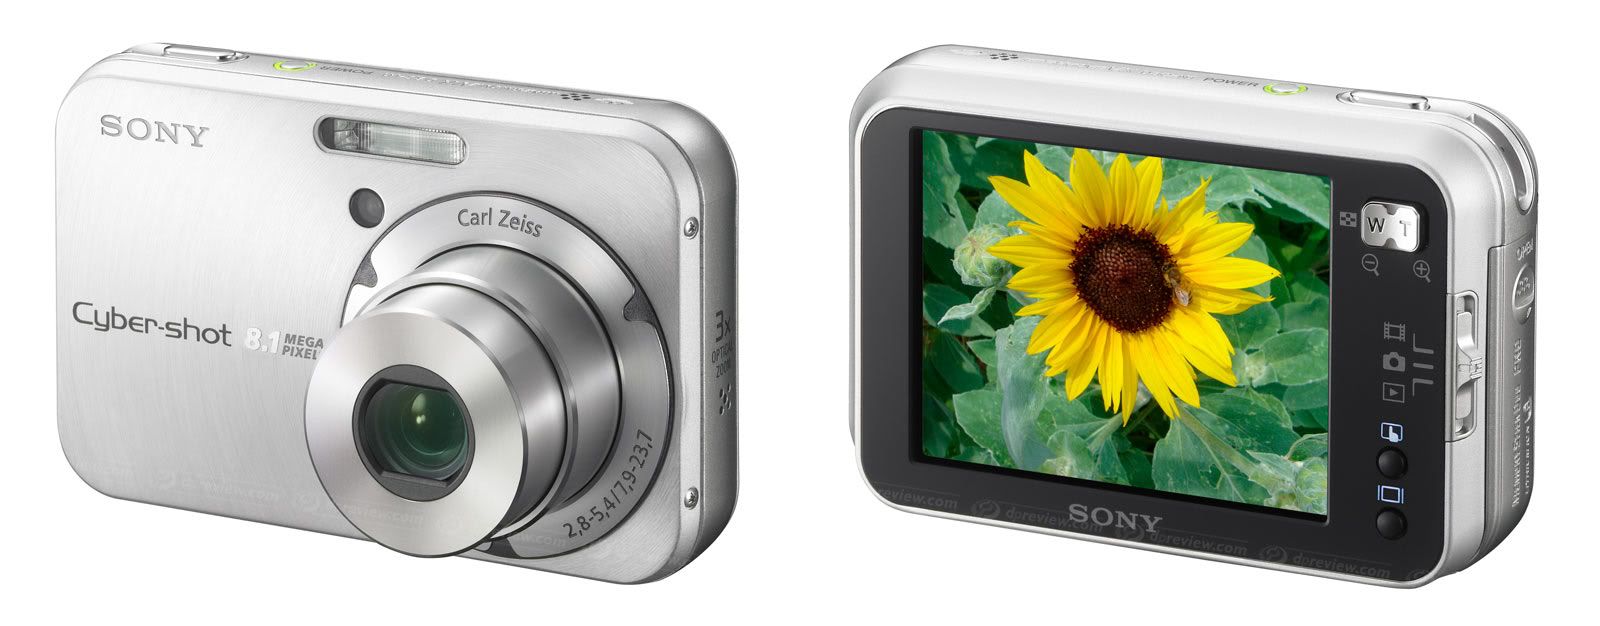
    The Sony Cyber-shot DSC-N1 has been replaced by the 10-megapixel N2. Besides the megapixel difference, the two cameras are almost identical. The N1 is still a good camera, and should still be available in some stores.

    No image? Click here

    Back in October 2005, Sony announced a new range a ultra-compact digital cameras: the N-series. Their first model was the compact and unique 8 megapixel Cyber-shot DSC-N1. It has a rather high price tag, and so the camera was aimed mostly above budget-level, for non-photographers who want great pictures and be able to show them off with everyone. The N-series slots in nicely above the ultra-compact T-series yet below the bridge-type H-series cameras from Sony.

    This type of camera was designed with the consumer in mind. It has a large, bright, wide viewing angle, high resolution screen. Just perfect for showing off the pictures and movies you've taken.

    Who should buy a Sony N1?

    The camera is targeted towards casual snappers who are looking for a good looking, reliable camera for memories' sake. It isn't really designed to be used by a demanding photographer.

    However in my review, I concluded that the image quality and manual controls meant that the N1 can punch above its weight. I'd say you could use it for high resolution landscapes and other still subjects.

    Key Features

    - Large, high-resolution LCD. Sony's Clear Photo® LCD technology.
    - Touch screen operation.
    - 8.0 effective megapixel Super HAD™ CCD.
    - Carl Zeiss® Vario-Tessar 3x Lens.
    - ISO range from 64 to 800.
    - MPEG video recording at VGA (640x480) resolution at 30 fps.
    - Built-in album function allowing storing of up to 500 photos.
    - Slideshow with Music.

    Community

    You can view thousands of photos taken with the Sony Cyber-shot DSC-N1 on its camera page on Flickr. You can view all the photos I've taken with the Sony N1 in my Flickr portfolio. There is also a Sony DSC-N1 group on Flickr.

    There are some more photos taken by the Sony DSC-N1 at PBase.

    Reviews

    The N1 has a few major reviews.

    Click here to view an in-depth review of the Sony N1

  • DC Resource's Review (by Jeff Keller). Jeff's enjoyable tone takes you through an honest, balanced review.
  • megapixel.net's review. A detailed review full of product shots and example pictures. A little tedious to read through.
  • Yahoo! Shopping - User Reviews. The quality is obviously dubious, but it's still worth reading a few of the reviews (36 at the last count).
  • Continue Reading

    Sony N1 Review: (Part 1 of 6)

    No image? Try clicking here

    A detailed real-world review of the Sony N1 compact digital camera.

    Skip to:
    << Previous Next >>


    Introduction

    Back in October 2005, Sony announced a new range a ultra-compact digital cameras: the N-series. Their first model was the compact and unique 8 megapixel Cybershot DSC-N1. It has a rather high price tag, and so the camera was aimed mostly above budget-level, for non-photographers who want great pictures and be able to show them off with everyone. The N-series slots in nicely above the T-series yet below the H-series digital compact cameras from Sony.

    This type of camera was designed with the consumer in mind. It has a large, bright, wide viewing angle, high resolution screen. Sony says is just perfect for showing off the pictures and movies you've taken. I'll start the review with the key features.


    Key Features

    - Large, high-resolution LCD. Sony's Clear Photo® LCD technology.
    - Touch screen operation.
    - 8.0 effective megapixel Super HAD™ CCD.
    - Carl Zeiss® Vario-Tessar 3x Lens.
    - ISO range from 64 to 800.
    - MPEG video recording at VGA (640x480) resolution at 30 fps.
    - Built-in album function allowing storing of up to 500 photos.
    - Slideshow with Music.

    Continue Reading

    Nikon D40: Overview

    No image? Try clicking here

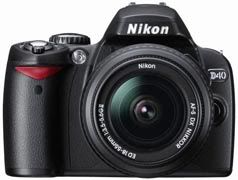
    The Nikon D40 is an entry-level digital SLR camera. It replaces the Nikon D50. It was announced in November 2006, after lots of speculation and leaks.

    Click here to read an in-depth review of the Nikon D40

    Who should buy a Nikon D40?

    The D40 is a camera primarily aimed towards beginners. It can "teach" its users about the innards of photography through interactive learning. Here's an excerpt from an article in Time magazine by Wilson Rothman:

    The D40 is a teacher. One of its most fascinating attributes is the Info screen, which appears at the touch of a button, appropriately marked "Info." The screen contains all sorts of data, mostly photographic mumbo jumbo. But the screen also has a visual representation of that mumbo jumbo, so you can figure out what it means. For instance, as the number next to the letter "F" goes up, the image of the camera's aperture gets tighter. It doesn't take long to sort out, then, that the higher the "f-stop," the more closed the camera's aperture. Beginners will appreciate the fact that the D40 has a knob of preset modes, not just my favourite "auto" mode but "portrait," "sports" and more. What's cool is that, when you change modes, the screen shows the changed settings. Little by little, the notions will start to sink in: what the camera is trying to do to shoot action, what it needs to take a portrait at night, etc.

    However, the D40 is versatile enough to serve more than just a beginner. If you're an amateur photographer on a budget, you'll find the D40's price extremely tempting.

    Don't think that the D40's "idiot" modes will get in the way, they don't. If you're already experienced enough to know the basics, then you'll be able to shoot in the more advanced P, A, S, M modes. While this camera is designed for beginners, it doesn't get in the way of the more advanced photographers.

    The D40 offers an incredible amount of camera for the money, and every penny seems well spent. Every now and then it makes the more expensive Nikon D80 look over-priced and under-powered.

    AF issue with Older Lenses

    The D40 will not be able to autofocus with lenses that don't have an in-built focus motor. Reason being that, it doesn't have its own “screwdrive” focus motor. A lot of older and third party lenses rely on the motor in the body to focus. Hence, they will not be able to AF on the D40. The only ones that are able to autofocus are Nikon's AF-S/AF-I type lenses, and Sigma's HSM type lenses.

    If you plan to use the autofocus feature of older lenses, then the D40 is not the camera for you. The newer lenses should all work perfectly however.

    Competition

    - Canon EOS 400D
    - Pentax K100D / K110D
    - Olympus E-410

    Main Features

    - 6 megapixel DX format CCD sensor (same used in Nikon D70 & D50, Pentax K100D)
    - Multi-CAM530 3-Area AF sensor
    - 3D Colour Matrix Metering II (420 pixel sensor) – for accurate exposures
    - ISO range from 200 to 1600, plus boost to HI-1 (approx. 3200)
    - Customisable Auto ISO
    - Up to 2.5 frames per second continuous shooting. Buffer: unlimited amount of JPEGs
    - 2.5", 230k pixel LCD monitor with high viewing angle
    - Monitor-based status screen – called the "Info" screen
    - In-camera Help Manual
    - In-camera Retouching Menu
    - Extensive list of Custom Functions, unusual in this price range
    - 0.8x magnification, 95% coverage viewfinder view
    - Small and compact, lightweight body
    - Value for money

    Reviews

    The Nikon D40 is a very popular camera, and has been reviewed by almost every major review station. Below are some links to the pick of the reviews..

    Click here to read an in-depth review of the Nikon D40

  • dpreview's Review (by Phil Askey). Probably the best review here. Technical, yet easy to understand. Extremely useful.
  • DC Resource's Review (by Jeff Keller). A nice conversational tone makes this one easy and enjoyable to read. Very informative.
  • Imaging Resource's Review (by Mike Pasini). A very exhaustive review. Goes into extreme technical detail. Supplied with loads of samples and a test gallery.
  • Review by Thom Hogan. Nikon expert Thom Hogan answers some technical user questions, and also provides thoroughly subjective observations on the camera.
  • Review by Ken Rockwell. Ken Rockwell's "opinionated, cranky style" is evident here. In this review, he avoids many technical aspects, in the sake of a simplistic review - but also makes some valid points about why he loves this camera so much.

  • Continue Reading

    Nikon D40 Review (Part 1 of 6)

    No image? Try clicking here

    A detailed real-world review of the Nikon D40 along with the 18-55mm f/3.5-5.6 kit lens.

    Skip to:
    << Previous Next >>


    Preamble

    The Nikon D40 is a very popular camera, with every major review site out there covering it. With good reason. It's Nikon's smallest and cheapest digital SLR ever. This meant opening up a whole new customer segment to the world of digital SLRs, and more importantly, an affordable gateway into the Nikon system.

    This is not meant to be a comprehensive, scientifically accurate user review, I'll leave that to the experts. The real purpose of this is to report my first impressions, both as a first-time DSLR user, and also as a photographer. I'll be making several comparisons to the Canon EOS 400D (Digital Rebel Xti).


    AF issue with Older Lenses

    The D40 will not be able to autofocus with lenses that don't have an in-built focus motor. Reason being that, it doesn't have its own “screwdrive” focus motor. A lot of older and third party lenses rely on the motor in the body to focus. Hence, they will not be able to AF on the D40. The only ones that are able to autofocus are Nikon's AF-S/AF-I type lenses, and Sigma's HSM type lenses.

    If you plan to use the autofocus feature of older lenses, then the D40 is not the camera for you. The newer lenses should all work perfectly however.

    Continue Reading