Tech, Tips, and Tutorials.
Reviews, News, and Rants.

Cool CSS Tooltips

If you’re reading this from an RSS feed, you’ll need to switch over to the web page (the CSS is in the head section, and thus isn’t loaded by an RSS reader)

In this tutorial you’ll learn how to make some really clever CSS-based tooltipsAnd it's actually really easy!.

The most basic way to create a tooltip from a link is to use the title attribute in a link. This small bit of text is displayed in a small box.

A tooltip is often used to explain outgoing links. A simple, unobtrusive tooltip is often all we need to use in our site design.

However what if we wanted to explain something further, or we wanted to add some formatting to our tooltip? Browsers differ in the way they display tooltips, and they differ even further if they spread across multiple lines.

Note that this tutorial assumes that you have a basic understanding of HTML and CSS languages.

Using the span tag to hide text

  1. First thing you have to do is remove any extra title attributes you may have on your link, so that it doesn’t interfere with our CSS tooltip.
  2. Insert the tooltip right after the link text, and enclose it in a span tag, like so: HTML
    <p>
        Check
        <a href="#">this <span>This is tooltip text!<span></a>
        out!
    </p>
  3. Now we need to style this. We should first hide the text inside the span tag:CSS
    a span {
        display: none;
    }
  4. By using the pseudo-class :hover, we can make sure that the text will show only if the user hovers the mouse at our link. We are basically telling the browser: “Change the display from none to block when the user hovers over a link”. Our CSS should now look like this: CSS
    a span {
        display: none;
    }
    a:hover span {
        display: block;
    }
  5. If you try to run your code now, you’ll notice some serious problems. The span element will act like a block and therefore push everything after it downwards!

    How are we going to get the span to appear without interrupting the page flow? We must use absolute positioning to get this. This way, it will have no effect on other elements, except for covering part of them. I’ve also applied some basic styling below to make it look more like a tooltip: a:hover span {
        position: absolute;
        display: block;

        /* styling */
        background-color: #323232;
        color: #FFFFFF;
    }
  6. Even though it’s looking more and more like a tooltip, right away you’ll notice some positioning woes. This is because of the absolute setting that we had to use before.

    To position it properly, we have to turn the link itself in to an anchor that the absolutely positioned span element can work from. To do that we have to set relative positioning on the link.

    In addition, we should also add some absolute positioning by specifying the top and left attributes. Also, we need to ensure that it’s always on the top. To do this we need to add a z-index attribute.

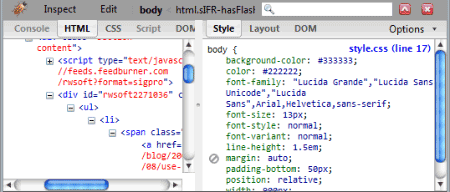
    This is how our complete CSS should look (syntax highlighting and all :)
    CSS
    a {
        position: relative;
    }
    a span {
        display: none;
    }
    a:hover span {
        position: absolute;
        display: block;

        /* positioning */
        top: 30px;
        left: 30px;
        z-index: 100;

        /* styling */
        background-color: #323232;
        color: #FFFFFF;
    }

Extending the concept

This hover/popup method is very powerful and can be extended towards all sorts of things. You can apply certain “tooltip” classes and even apply some HTML on the tooltip. For example, you can have an image gallery, and a larger version of the image pops up in the tooltip. Remember that they don’t even have to be linksSince you don't specifically need the link tag (hover your mouse over the bold text!)

The original concept for the hover/popup CSS method was first shown on Eric Meyer’s website. Thanks, Eric!

Continue Reading

9 beautiful Sony Ericsson themes

Sony EricssonGo to sonyericsson.com mobile phones are very extensible devices, they can be extended by Java applications, and they can also be skinned – ensuring that no two SE phones have to be the same ever again.

Naturally, SE phones have a vibrant creative community, and so there’s plenty of free themes to choose from. Ever since I got my K610iK610i homepage, I’ve been looking high-and-low to find my favourite. Below are nine of my favourites in no particular order.

Editor’s Note - Note that the display resolutions on Sony Ericsson phones vary. This means that while (e.g.) themes designed for 240x320-pixel screens will still work on (e.g.) 176x220-pixel screens, they won’t be specifically designed for that screen. Proceed with caution.

Windows Live

Windows Live is a well-designed theme that aims to mimic the look and feel of desktop-based Live applications. It’s designed for 176x220-pixel screens, such as the K550 and K750.

AquadromeXT

A very nice collection of five themes in 5 different colour schemes. My favourite is the lime-green one. As with Windows Live above, it’s designed for 176x200-pixel screens.

Glazz

A gorgeous glassy theme with lots of green. There’s a huge compatibility list, so you’re very likely to find a matching version.

Aero Glass

Another glass-inspired one. A very sharp theme with a dark flair. Rough in places but top work overall. Appears to be designed for 176x200-pixel phones (judging from screenshots - no details given).

iPhone

This iPhone theme attempts to mimic the look and feel of the real device. I have to say it’s a very nice job. I love the little “X” on the small dialogs. It also includes the ringtones. Designed for QVGA (240x320-pixel) screens, such as the K800i. Big download, this one.

iAurora

One of my highest-rated themes. A beautiful combination of a soft background and delicate colours. Lovely. Designed for 176x220-pixel screens.

The Green

Also available in red and blue. A very modern theme with loads of life and energy. Designed for QVGA (240x320-pixel) screens, but works well on a smaller screen.

Bolino

Despite the strange name, this is a solid theme with nice shades of blue. Designed for 176x220-pixel phones.

Chocolate

A gorgeous theme with lots of neat touches and flourishes. Beautiful shades of brown. Designed for both QVGA, and 176x220-pixel phones.

Got your own favourite theme for your mobile? Did I leave out a great theme? Let me know in the comments!

Continue Reading

Apple Beats Microsoft in Font Rendering

When Apple introduced its Safari browser for Windows, I for one, realise what I’ve been missing. And no, it’s not the “authentic Apple experience” which I dont buy into. It’s the font-rendering.

Windows Internet Explorer font rendering:

Safari font rendering:


Even with ClearType turned on in Windows Vista, I think it just doesn’t look as good. Fonts look bolder, and more like they’d be if they were printed.

Microsoft has its own font-smoothing technology called ClearType, it was designed with the intent of screen-reading. In fairness, ClearType is a massive improvement over the regular Windows font-smoothing. However, Mac’s own font-smoothing technology just looks better.

ClearType’s problem isn’t so much a problem as a different philosophy. Apple wanted to accurately replicate the fonts we see when printed, and Microsoft made it easier to read things on screen.

Both systems have their advantages. Over a long period of extended use, I think Windows’ rendering might just have the edge, and many agree. However Safari’s level of font-smoothing can be reduced. I have mine set on medium.

Every time I load up Safari to check rendering issues, it just looks better. While it may not be as readable, it makes text so much more beautiful.

Disagree? Have something else to add? What do you think? Let me know in the comments.

Continue Reading

Notepad2 (featured freeware)

This series takes a look at some of the best free software available on the World Wide Web.

The default plain text editor on Windows is called Notepad, and hasn’t had any major changes since its inception way back in 1985. Up until Windows 95, there wasn’t even a choice of fonts! Only Fixedsys was available.

However people today still use it on a daily basis because it offers fast, simple plain-text editing on the go. Just double-click on the file, change one or two things, Ctrl+S and we’re done.

It’s particularly popular among programmers and web-coders. But everyone is also aware of its many limitations. It doesn’t have auto-indent support, doesn’t support syntax highlighting, bracket matching, and other features such as regex-based find-and-replace.

Enter Notepad2

This is where Notepad2 steps in. Written by Florian Balmer, it is a free notepad-like app with the intent of replacing the original Notepad for day-to-day text slinging.

Besides having all the features mentioned above (the original Notepad’s limitations), it is also extremely fast and super-easy to use.

The deal-maker for me was the fact that it:

  • Supports automatic indentation
  • Has bracket matching
  • Supports syntax-highlighting for every major programming/scripting language out there. It recognises simple Java files, CSS, XML, and HTML files, and last time I was creating an Apache config. file, and it even recognised that
  • Has a multitude of customisable options and configurations to make it work exactly the same way you do.

Not once has Notepad2 let me down. Its features are almost perfect and it’s super fast. I also love the fact that it doesn’t support a multi-document interface. This is great because it’s simply meant to be a notepad replacement, not a full-featured IDE.

Download

Extra: Replace notepad.exe with Notepad2.exe

There would understandably be a great demand for this hack, since it would enable you to double-click on a text file and have Notepad2 take care of your editing work. No more right click > open with… > Notepad2.

Luckily, there is a solution! Try this hack, and if it doesn’t work, try a Google search.

Got a favourite editor you use? Perhaps you use the popular Notepad++ instead? Let me know in the comments!

Continue Reading

Innovative clock screensavers

In the past, the role of a screensaver was very important. It was invented to prevent screen-burning. Very old CRT monitors were susceptible to having areas of the screen ruined by displaying non-moving text and graphics continuously for long periods of time. The screensaver’s job was to either blank the screen or fill it with moving images or patterns when the computer was idle.

Nowadays, screensavers are used for entertainment. Modern monitors don’t suffer from screen burn and so we don’t have a real use for them anymore.

Many people also use their screensavers to tell them the time. However, the default screensaver-clock isn’t very appealing at all to look at (at least in Windows).

Terribly ugly isn’t it? Luckily, there’s quite a few innovative clock ideas you can choose from (prepare to scroll…)

Word Clock

Word Clock is one of those gems that you had no idea existed, but when you find it, wish you had found it years earlier.

This screensaver’s design is an absolute masterpiece. Every second, the clock updates. For example in the picture above, the highlighted “fifty-seven” will go back to grey and the “fifty-eight” next to it will highlight itself in red.

Another intriguing option offered by Word Clock is the rotary version. It has a similar feel as an old analog clock.

Everything about the screensaver is customisable – from the typeface to the colours, the size and position to text-transformations (uppercase, lowercase), making it three times as useful.

Fliqlo

This is a much simpler design than Word Clock, however it is still a very nice and simple design. It is also extremely light on system resources.

As for customisation, there isn’t much. The good news, however, is that it’s integrated into the screensaver itself. When the screensaver’s playing, hit the up/down arrows to change zoom or the left/right arrows to toggle between 12 or 24-hour clocks.

  • Download Fliqlo (available for Windows and Mac OS X – choose the left-most cassette)

PolarClock

PolarClock takes a very unique approach and presents its information in a beautiful set of coloured concentric bars. The bars change colour depending on the position they’re in.

Be warned, however, that this isn’t light on system resources. My relatively lightweight system (1.8GHz, 2GB RAM, Mobile Intel Graphics) struggled to cope with PolarClock.

Further reading

Continue Reading

PDF Tools, Tips, and Resources Collection

An excellent set of PDF bits has been posted up at Honkiat. It’s a very comprehensive, feature-everything kind of post (80 tools are featured). It’s extremely useful and will, without a doubt, still be useful years later.

What are PDFs?

PDFs are a very useful file type. It’s used to send around electronic documents — such as forms, reports, legal stuff, and even advertising material.

PDF is a great format because it presents the documents exactly as you see them. A PDF will appear the same on your work computer, your home laptop, your PDF-reading smart-phone, literally everywhere, custom fonts and all.

Continue Reading

Suggestion Box

  • Got a great suggestion that you think I’d like to read about?
  • An idea for an article, for a “how it’s done” tutorial, or even a feature?
  • A feature you’d like to see implemented?

In an effort to make the content even more relevant, this post will serve as a suggestion box. Simply leave a comment on this very post. Every suggestion will be responded to in kind.

Your Opinion Counts

So make it count to me! Suggest something to me today. Use the comment form


Note: The Suggestion Box is now playing host to the ThemeForest competition.

To participate, read the submission rules and submit your best suggestions in this post’s comment form.

Be sure to quote the following somewhere in your suggestion: “Entry for ThemeForest competition: Best Suggestion
Continue Reading

9 Firefox Extensions I couldn’t live without

I’m a bit of an extension-addict. While I worry that my Firefox will slow down, I worry even more that I’m not fully making use of all the capabilities that Firefox can offer me.

What’s Firefox? In case you’ve been living under a rock (or just aren’t tech savvy), Mozilla Firefox is a web browser. You use it to view websites, just like Internet Explorer, only much, much better, in every way.

In the list below, I’ve listed 9 extensions which I use in varying frequencies.

Note: While these extensions work for me, I couldn’t imagine that I use the same as everyone else. This is just a personal list.

Critically important

Here are 3 ultra-important extensions which I use daily to help me get work done.

1. Firebug
It’s fair to say enough’s been said about this one extension that whatever I add is already redundant. It makes web-development fun again. It offers things like real-time editing of things like CSS, a powerful Javascript debugger and console, and a way to inspect and edit HTML.

I use it in a very simple way. When editing a site, I simply create a basic CSS style, load it in Firefox, hit F12, click Inspect, and I’m in the money. In plain terms, if you do web-design, then you have to get this.

2. Foxmarks

A lifesaver if you have more than one computer. Foxmarks makes it amazingly simple to have the exact same set of bookmarks across computers running Firefox.

Essentially - you create an account, and it stores your bookmarks on a secure server. Then Foxmarks will download the stored bookmarks and merge them with your current set (or it can simply replace everything). Every time you edit your bookmarks (e.g. adding a new one or re-ordering them), Foxmarks will silently back them up to its servers.

As an added bonus, you can access your bookmarks anywhere by going to http://my.foxmarks.com and entering your username and password.

3. IE Tab

Does what it says on the tin, and quite brilliantly too. Need to test a site in Internet Explorer? Hate using Internet Explorer? Try this.

Successfully runs Microsoft Update, and even Active X controls. A saviour for those sites who don’t fully work with Firefox. Excellent extension.

Very useful

I also use these 4 extensions very often. They save me quite a bit of time and are just plain helpful.

4. CoLT
Short for “Copy Link Text”, CoLT does its relatively simple job spectacularly well. It makes it “easier than ever to copy a hyperlink’s associated text”. Visit the home page for a better-explained article at what it can do.

5. FireShot
It offers both a free and a pay version. The free version is very useful for my intended use. It basically offers the ability to create screenshots of webpages, both the visible area, or the entire page. Fireshot offers a variety of ways of saving your screenshot – I often just save it to the desktop or onto the clipboard. It also offers annotation and editing tools although I seldom use them.

6. Firesizer
A very handy, tiny extension which displays the current size of the Firefox window, and allows you to resize the window according to pixel-dimensions. Firesizer is useful for testing fixed-width layouts.

7. Flagfox
Ultra-useful addon for displaying information about a website – including location (using Google maps) and server information.

Handy

Here are 2 extensions which I find useful from time to time.

8. UnMHT
Empowers Firefox with the ability to save and write MHT files, a standard used for saving complete web pages.

9. Opanda IExif
Requires you to install the excellent IExif program first. This Firefox extensions offers right-click access to a photo’s EXIF information.

Continue Reading

FF Nuvo (featured freeware)

FontShop, world-renowned for producing some of the world’s best-designed fonts, has released FF Nuvo as a freebie for a limited time only.

The font file is a medium-weight, OpenType font. Here’s a short description of the font:

FF Nuvo has a soft, calligraphic touch. Its small caps, multiple figure sets, and italics make it a useful family for editorial, advertising and packaging. Its alternate glyphs add typographic versatility.

Here’s a specimen:

Note: Type specimen created by me, using material from a random sentence generator.

Download

Update: 12-Aug-08

Installing Fonts

I realise that some readers may not know how to install fonts on their system. Below are some instructions for a few operating systems.

  • Windows Vista: Right click “NuvoOT-Medi.otf” and click Install
  • Windows XP: Go to Start > Run > type in “fonts” > drag-and-drop “NuvoOT-Medi.otf” to the Fonts folder
  • Mac OS: Drag and drop the font into the Fonts folder in the Library folder
  • Linux: Depends on distribution (this might help).
Continue Reading